JSRobots Programming Game

TLDR: link (In mobile the interface is awful, but it’s your life)

I was at my company gathering the other day and I ended up chatting with a colleague, let’s call him Alberto, who has a young son. We were discussing that he would like to get his son interested in programming, and since I’ve also developed the passion for programming and computer science at a quite young age, he was asking for advice.

So I was trying to remember how I got interested in programming, and I have no answer for this, I guess it was a combination of my father introducing to it and me discovering the power to control this mistical thing that was the computer at the time, not obiquitous like they are now, with smartphones, smart devices and so on. But still, I think the my interest was very much related to the fact that programming gives you very powerful building tools to unleash your imagination. It’s like Lego, but you don’t have to ask your parents to buy you the new set to have more pieces, all the pieces are already there, you just have to discover them. In fact, this is the hard part: discover the tools and how to use them is the key. This can be a tedious and long process, and it’s difficult to focus for this much time especially at young age, you really just want to “play”.

But sometimes you find some ways to bridge the gap and that lets you have some quick results. After having a way to easily see how you can affect a digital world, here’s where you understand if you like programming or not. And I loved it.

So, back to me at a young age, I remember at some point, probably around 13 years old or so, already admittingly quite deep into the computer science world (I had already some little programming projects ongoing) I discovered a programming game called JRobots. It was inspired (actually more than that, almost only a Java port of that) by a much older game called CRobots (written in C). It’s a simple game in which you can program your bot to fight against others in an arena, defining its behaviour by coding its “brain”, which takes decisions on how to act at every time step.

But the JRobots game still had a lot of overhead to get started, install and setup the JVM, download the source, make it run correctly, download other people’s bots and make them run along with the rest. I was lucky to have the knowledge to do it, and spent some months playing with this game, learning trigonometry and implementing new ideas (algorithms) like no school teacher could have done, in a very funny way.

So, here you have JSRobots, a JS rewrite of the thing. As in JRobots, in this programming game you have to write some code to control the behaviour of your “robot”, which is then placed in an arena to combat with another bot (possibly written by someone else). I think this is a nice way to get closer to programming because with very few lines of code you can see the differences of behaviour of your robot, and you can iteratively make it better and see its improvements and fails. Behing written in JS and running entirely in the browser, this is a zero overhead way to start writing some code. You start with the given example, you try to change it, press one button and the code is executing, showing your impact in this digital world.

Current state of the project is it’s a proof of concept, and can be improved in many ways. Has no server side logic, I could add some to be able to submit your bot for others to play against, but I have to take into account some security concerns before implementing that. For the rest, It’s missing some debug options for sure, but it’s usable.

The rules and documentation for the game are provided on the website itself (thanks to chatGPT again, if it’s not clear enough complain to openAI) and if you wish to send me your bot to be added to the list of opponents please do. You can find one of my emails somewhere in this blog or in the internet or at nicassio.it/daniele

The code is also on github

Party Guestbook

Now in Barcelona, home parties are back again! So, following other projects I did for party guest entertainment, this time I decided to develop a digital Guestbook for people to use.. it was nice!

Also, this time I asked chatGPT to help me, and in 4 to 5 prompts I had it all done – with some tweaks afterwards. The way I interacted with chatGPT to produce some working code was nice, a first for me, but I would say very convenient. I had exactly in mind what I wanted, just didn’t know how to do it in detail without searching the internet. So here are a screenshot of the result and the prompts I used to build this:

ChatGPT prompts, with ChatGPT commenting on them:

[AI written content starts here]

Prompt 1: Node.js Express Server with Queue Endpoints

Prompt: Write a node.js Express server with two endpoints: a POST /add that adds a text to a queue, and a GET /queue that returns a JSON with the queue and empties it.

Description: This prompt asks for the creation of a Node.js Express server with two endpoints. The first endpoint (POST /add) should handle a POST request to add text to a queue. The second endpoint (GET /queue) should handle a GET request to retrieve the queue and empty it. The goal is to implement a basic queuing system using the provided endpoints.


Prompt 2: Serving Static Files in Express

Prompt: Modify the code so that every request to files in the public/ folder is served as normal files.

Description: This prompt involves modifying the Node.js Express server code to serve static files from a public/ directory. The goal is to ensure that any requests for files within the public/ folder are served as normal files, allowing them to be accessed by clients. This modification will enable the server to serve static content such as HTML, CSS, JavaScript files, images, and other assets stored in the public/ folder.


Prompt 3: HTML Page for POST Submission

Prompt: Write an HTML page to submit a POST with a JSON payload populated with a text taken from a textarea as an input.

Description: In this prompt, the task is to create an HTML page that includes a form with a textarea input. The user will enter some text into the textarea, and upon submission, a POST request with a JSON payload should be sent to the server. The JSON payload should contain the text entered in the textarea. The purpose of this HTML page is to allow users to submit text to the server for further processing or storage.


Prompt 4: Displaying Queue Data Dynamically

Prompt: Write an HTML page that reads data from the queue with an async call every 10 seconds. Display the pieces of text that it reads from the queue in a random font, color, and size, and place them in a random position on the page.

Description: This prompt involves building an HTML page that fetches data from the server’s /queue endpoint every 10 seconds using an asynchronous call. The retrieved data represents a queue, and the goal is to dynamically display the text from the queue on the page. The displayed text should be styled randomly with fonts, colors, and sizes. Additionally, the text should be positioned randomly on the page, creating a visually dynamic and engaging display.


Prompt 5: Generating QR Code SVG for URL

Prompt: Write the HTML code for an SVG image representing a QR code for the URL https://giada.0bl.eu:3000/add.html.

Description: In this prompt, the task is to write the HTML code for an SVG image that represents a QR code for a specific URL. The provided URL is https://giada.0bl.eu:3000/add.html. The generated SVG image should be suitable for displaying a scannable QR code that, when scanned, will direct the user to the provided URL. The QR code is a widely used method for encoding and decoding information, often used for quickly accessing URLs or other data through mobile devices.

[AI written content ends here]

So, thanks to ChatGPT for helping me code this project, but also for helping me write this too long and inflated blog post. I guess you can paste all this into chatGPT and ask it to make a summary of it, in a net-zero information process that earns some money to openAI 🙂

Advanced Mortgage Calculator


amc

After my first post about a simpler mortgage calculator now I developed a more advanced one, especially designed to compare different mortgages, and calculate which one lets you pay less interest over time.

The app can be found here

amc2

Compared to the last tool, which just calculated the total interests and the installment amount, this app offers these other features:

  • charts of the installments over time
  • capability to add different types of events:
    • interest rate change
    • time renegotiation
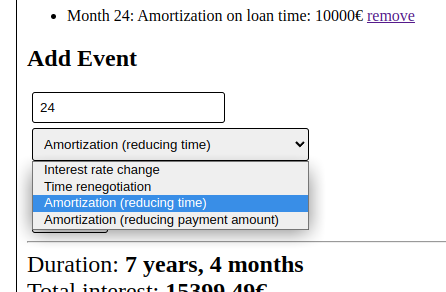
    • amortization on time
    • amortization on installment amount

amc4

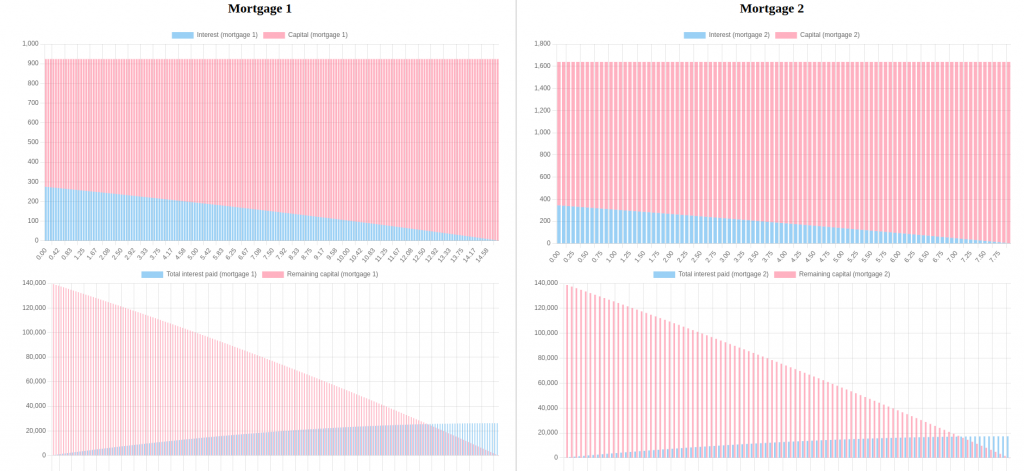
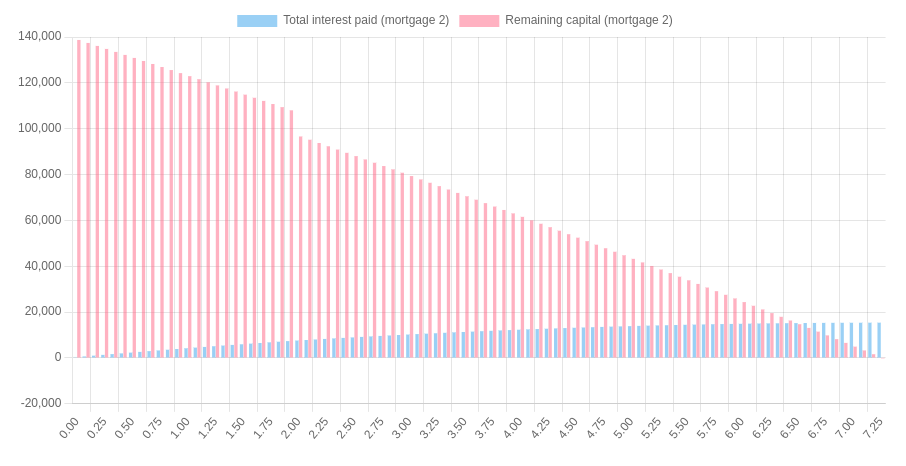
Adding events makes this tool extremely versatile and allows for simulating complex scenarios. You can compare a 10 year mortgage with a 20 years one in which you reduce the time amortizations with annual cash deposits, or a combination of different interest rates which may happen in some situations. The charts are updated automatically, and there is a comparison chart to make it easy to compare the two mortgages over time, focusing on the interest amount paid.

amc3amc5

Plani3D – Planimetry/map to 3D model

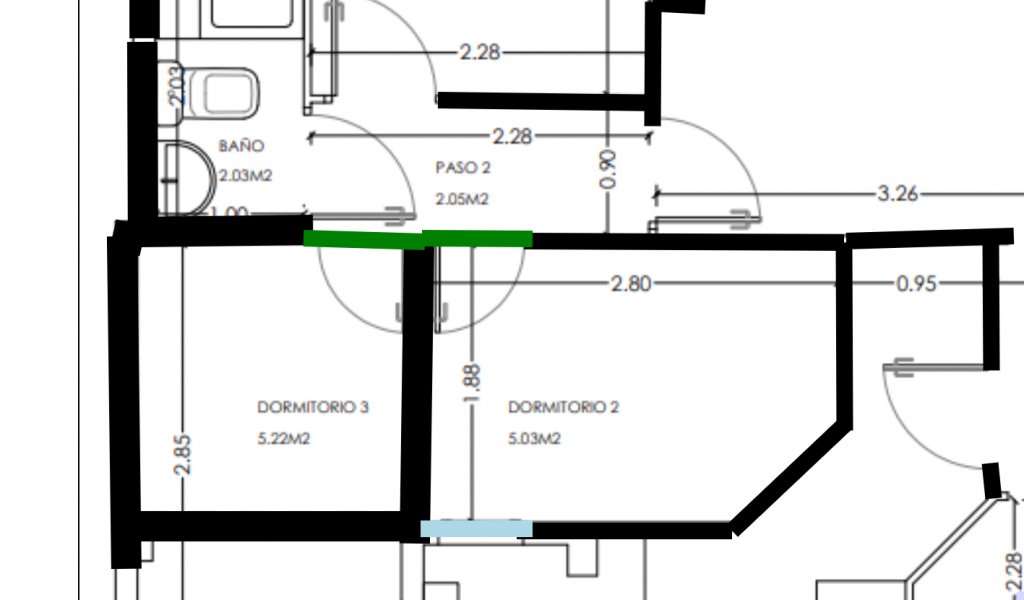
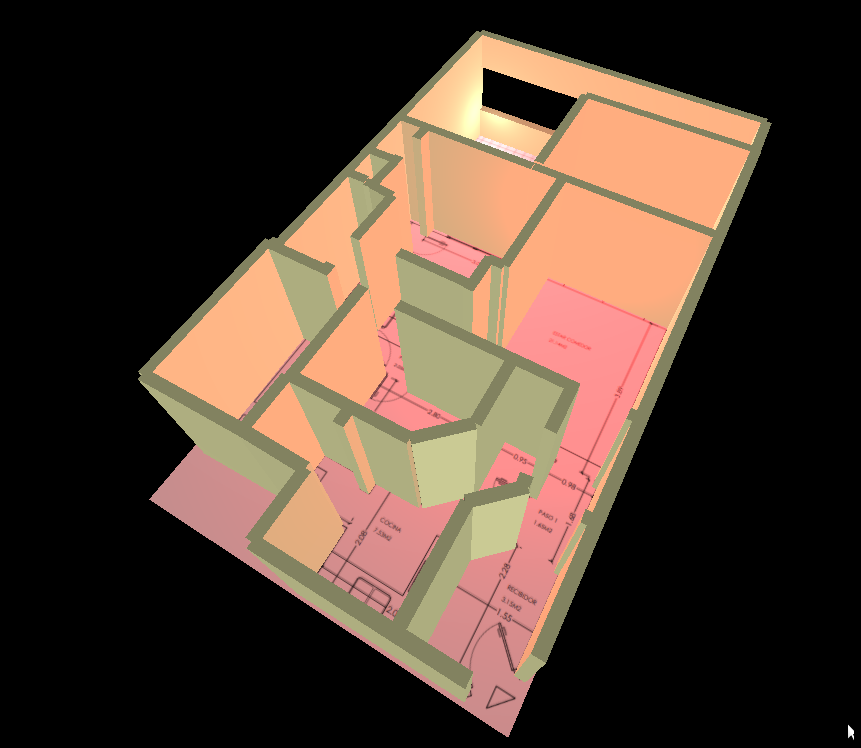
In the last days I’ve been working on this helper software to make it easy to turn a planimetry of a house into a simple 3D model to make it easy to visualize it or any modification you would want to make.


plani3deditor

Plani3D

plani3d_conpla

The functionalities are extremely limited and it may be buggy – it was only coded to suit my specific needs.

So far it lets you:

  • Load a custom image (planimetry, map)
  • Define a scale (so the 3d model will have the right measures)
  • Draw 3 types of entity with the mouse
    • Walls
    • Windows
    • Doors
  • Change thickness of walls
  • Generate the 3D model
    • saving the link will let you see it in the future too, the model gets encoded in the url (which could get veeery big)
  • Export the generated model as a GTLF file

Note: no deletion of added walls is possible at this time. Not even editing the generated model. It’s more a rapid prototype tool, doesn’t let you make things precisely.

The project can be tested here.


Crypto bot

Recently I’ve been following the crypto market, which is very fascinating to me. I’ve subscribed to kraken, a popular exchange and put some money in it. After a service outage in the middle of january, kraken’s team decided to cut the transactions fees for a while, thus I took the opportunity to code and test a from-scratch crypto-trader bot.

I have no time to get into details, also because they are not so much interesting or particularly complex, but I’ll say that it uses a combination of some simple and common algorithms widely used in the study of the financial market. The bot actually works, in the sense that it makes trades on some deterministic rules, but unfortunately it is not clever enough to make profit (even without the fees) and barely breaks even.

Anyway, as always, it’s been very fun and instructive to code, as I had to study and learn how the market behaves, how to handle the market data and how to try to predict trends and accordingly set sell/buy points.

Since I’m not posting the code (yet), here’s its debug window:
cryptobot_best

Who wants to be millionaire?

You probably know the tv show “Who wants to be a millionaire”. Lately I’ve been invited at the graduation party of a friend, and thought about creating a game for it.

So I decided to create a HTML5 simulation of WWTBAB, complete with webcam support, sounds and introduction video. It has been quite fun, and I’ve been releasing the code on github.

Questions are hardcoded in the index.html file, but it’s trivial to modify them. Recently I’ve added support for images in questions.

I really don’t know if someone can actually make use of it, but who knows?

Just a quick overview about the keys used to control the simulation:

  • [Left arrow] – to skip to next step (video is not skippable by now)
  • [Down arrow] – to unveil the next answer
  • [A,B,C,D] – to highlight the selected answer
  • [Y,N] – when an answer is highlighted, Y makes it correct, N makes it wrong
  • [F] – to switch between the default background or the webcam image
  • [P] – to flash the background to induce some suspance

Github.

Example-link.

A try for a 3D game

Recently I’ve been experimenting a lot with 3D in the browser with Three.js, and although this is my first post about it, there’s a lot more I’m working on about 3D in JS, but it’s involved in my professional work and it’s not time to publish it yet.

Anyway, as usual I like to keep track of my projects here, so I link to this simple game I developed as a joke for a friend some days ago. The game is here, descriptions are in italian but if you don’t understand just click and everything will be fine.

JSMol plugin vulnerability and thoughts about security

JMol is a library used to create 3D models of molecules in Java, which can be embedded into webpages using the usual applets. JSMol is a Javascript library which is used to provide the Jmol capabilities through the HTML5 technologies, relying on server side computation for some functionality.

Here’s a short story about how I discovered some pretty bad vulnerabilities in the JSMol software, and how it can affect every server which is hosting this software.


Using my university’s moodle installation, I discovered that the JMol/JSMol plugin for moodle was installed and probably misconfigured in some way: it had unusual permissions set in its directory tree.

This made me curious and I wanted to better understand what was going on.

I made some research, and discovered the plugin along with its source code (the project is entirely open source), and started to look at the source of the only PHP file in the JSMol package.

Looking through the code, I discovered a lot of parameters used without proper sanitizing and checks, and quickly discovered two related and pretty serious vulnerabilities.

The first one is a vulnerability which allows an attacker to read the entire filesystem with the PHP process’ privileges. The second is even worse, but it seems it had been fixed in the newer releases of the software, and was about arbitrary execution of commands on the server.

They derived from an insecure use of PHP’s file_get_contents() and exec() functions in combination with badly checked parameters coming from GET and POST variables.

I immediately contacted the developer of the plugin and reported the vulnerability, along with the curator of the JMol plugin of moodle.

As of today, the vulnerability has been fixed by the developer, and should be available in the latest version of the software.

Anyway, some research I’ve made suggests that the vulnerability was present in many websites using the plugin, which I thinks are unlikely to upgrade the software. In particular I analyzed every registered moodle installation from moodle.net (roughly 50k) and discovered that a small fraction (~100) had the plugin installed and was vulnerable.

I would not classify it as a widespread vulnerability, but I think this should remind us of the nature of websites’ security. In fact, I would say that every even small piece of software publicly accessible on a website should be cause of concern when thinking about security.

As is often said, the best thing to do about software security is to firmly believe that you don’t have any.